
Bunker vs Verity Defense Strategy
A practical Bunker vs Verity defense strategy: layered turret coverage, the day-to-night defense cycle, and fixes for the failures that end runs.
A bunker defense in Bunker vs Verity is a repeatable cycle, not a one-time build. During the day you finish walls and one controlled entrance, place turrets so their fields of fire overlap the approach lane, and bank a coin reserve. Before nightfall you inspect firing angles and coverage gaps. During the wave you hold your zone, repair immediately and focus the deadliest Verity. Between waves you find the next likely breach point and split coins between repairs and the next upgrade. Everything in that sequence is under your control — the wave only decides how hard those decisions get tested.
What your bunker is up against
Verities attack in waves, and the game runs a day-night rhythm: daylight is for building, earning coins and upgrading, while night brings the attacks. The longer a run lasts, the harder the Verities become, which is why the work between waves matters as much as the fight itself.
Waves are deliberately mixed. They combine fast threats that rush entrances, durable threats that absorb turret fire, and grouped pushes arriving on several lanes at once — so a defense built around one turret type or one firing lane eventually fails. Verities concentrate on walls and entrances: the prime targets are entrances and doorways, damaged or thin wall sections, and isolated, unprotected defenses. For the enemy types in detail, see the Verity enemies and waves guides.
Recorded runs add one warning the early game hides: the first waves mostly come through the front, but deeper waves attack from the sides and rear, and some Verities can dig down into underground rooms. A one-lane fort is a loan, not a defense.
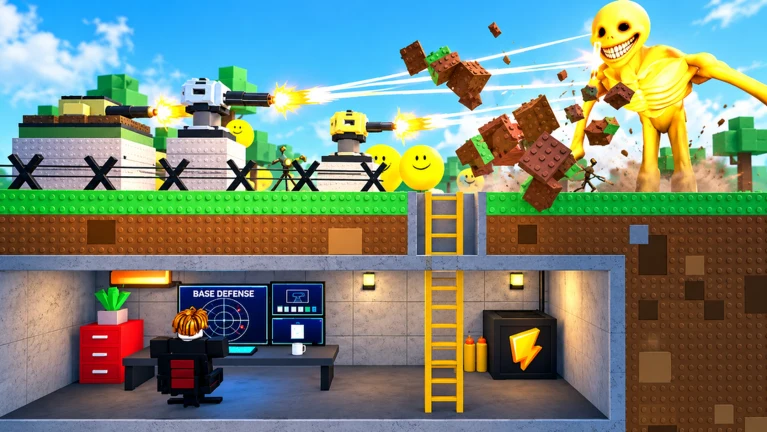
The defense cycle: prepare, close, cover
This loop combines the game's official toolkit — fortify with blocks, place and control turrets, earn coins from kills, upgrade, hide underground when things get bad — with community guides that converge on the same steps. If your bunker doesn't exist yet, the build guide covers construction from scratch; this page picks up at defense planning.
- Finish essential structure first. Place main walls and one controlled entrance, keep the interior compact, and close exposed entrances before buying upgrades. Skip decorative construction during the opening phase.
- Place the first defenses on the main approach. Put the initial turret where it covers the approach to your entrance and the most likely attack lane, prioritizing overlapping coverage over isolated placements. Guides differ on the early minimum — one says a single well-placed turret holds the earliest waves, while survival checklists treat two overlapping fields of fire as the standing minimum — and reconcile it, in practice, by wave phase: one turret first, a second overlapping arc once waves start mixing directions.
- Bank a coin reserve. Earn through the day phase without emptying your wallet; a reserve for emergency repairs is usually worth more than one extra early upgrade.
- Run the night inspection before the wave spawns. Confirm every item:
- All wall sections repaired or reinforced, with no exposed entrances or gaps
- Turret firing angles clear of walls, objects and teammates — coverage overlapping, not stacked in one spot
- Interior movement and fallback routes passable, with a fallback position identified behind the first layer
- A coin reserve that covers at least one emergency repair
- Roles and lanes assigned — builder, gunner, scout; in co-op, one coordinator confirms repairs, staffing and the reserve
- The next likely breach point identified
- Hold and repair during the wave. Stay in the defense zone, watch the approach, and identify which lane the wave is concentrating on before committing repairs or repositioning. Repair damaged sections immediately — a breach ends a run faster than a missing upgrade — and concentrate fire on the most dangerous targets, usually the durable Verities chewing through walls. Shift attention to the weakest side instead of leaving your post; chasing Verities away from the zone creates openings the rest of the wave exploits. If several Verities break through at once, the guides' answer is a crossfire layout at the entrance, a scout calling the threatened lane early, and a reserve that lets the builder reinforce the right section before it fails. Against a giant, solo players repair in the short intervals between its attacks, and if the outer wall falls, fall back to the prepared second line so the fight stays inside turret coverage.
- Recover between waves. Walk the perimeter, inspect damaged sections and the next likely breach point, verify firing angles and coverage gaps, then split coins between immediate repairs and the next planned upgrade. Repair during waves; save upgrades and reinforcement for this window.
Success check: a layout is working when turrets can see and fire at enemies across the entire approach rather than only at the entrance. A turret whose firing arc is blocked by your own construction contributes nothing.
What recorded gameplay confirms — and what is guide advice
Recorded sessions of players surviving into deep waves demonstrate mechanics you can rely on:
- Turrets fire automatically once placed. A placed turret was shown working on its own; nobody has to man it for a lane to be defended.
- Turret types differ in range and damage. In one recorded session the cheap red turret had simple range and damage while green turrets covered far more ground. Treat specific numbers from any single video as that session's progression, not stable game data.
- There is a cap on turret count. One player filling a base perimeter had to remove turrets before new ones could be added. The cap is real; whether it is fixed or grows with progression is not established.
- Height and roofing work. Players stood on block perches Verities could not reach and mounted weapons on a roofed-over base so enemies could not climb up; one fortified block wall with doors held back a giant wave.
- Attack directions shift with depth. A mid-game raid came mostly through the front, while deeper waves in other runs forced players to rotate weapons to the sides and back.
- Verities dig. Recorded runs show them tunneling down into underground rooms — going underground is a fallback, not immunity, so cover floors and guard below-ground approaches too.
- Boss-scale waves destroy turrets. One recorded run met a giant boss wave at wave 10 that wiped several turrets in a single push; expect milestones to hurt and keep a reserve for rebuilding.
On top of that, community guides repeat a consistent set of placement rules. They are widely repeated advice rather than measurements, but they match what the recordings show: prioritize overlapping coverage over quantity; never let walls, props or teammates block a firing arc, because a blocked turret contributes zero damage regardless of its tier; and before each wave verify three things — firing angles unblocked, no coverage gaps, and every turret actually contributing. Repositioning a blocked turret is often worth more than buying a new one.
Matching turret roles to the wave in front of you
Community guides sort turret purchases into roles by the threat pattern they answer. These role names are fan-guide frameworks, not official classifications — the same guides note that official enemy names and stat values are still undocumented and no official boss category is confirmed — but the matching logic is useful when deciding what to buy next:
| Threat pattern | Defense role | Placement note |
|---|---|---|
| Fast Verities, weak alone but dangerous in packs | Fast-attack early defense | Near the entrance on a short lane; cheap opening coverage before income grows |
| Grouped pushes arriving on one lane | Crowd control | At chokepoints, where it buys repair time even with lower single-target damage |
| A durable Verity chewing through walls | Single-target damage | A long, clear sightline on the approach lane |
| Mixed or general waves | Balanced core defense | Main-approach coverage for the whole run; build this before situational options |
| A threat dangerous in only one specific lane | Narrow specialty | Only where its exact arc matches that lane |
Build one balanced core position before adding situational options; specialty placements drop in value quickly when the wave pattern changes.
Coin spending by wave phase
Because Verities grow stronger every night, build the defense for the wave after next, not the one currently attacking. Coins convert into survival power when they are spent before a crisis rather than during one:
| Phase | Wall priority | Turret priority | Coin rule | While under attack |
|---|---|---|---|---|
| Early waves | Close exposed entrances before upgrades | One turret covering the main approach | Keep a reserve after first builds | Kill enemies reaching the bunker; do not expand |
| Middle waves | Upgrade frequently attacked sections | Add coverage only when a lane slips | Fund a repair, one upgrade and a replacement turret | One player repairs while another fights |
| Late waves | Reinforce the weakest sections first, skip cosmetics | Upgrade proven positions, keep overlap | Enter hard waves with a full reserve | Protect the core, repair immediately after damage spikes, focus the deadliest target |
| Between waves | Inspect damage, predict the next breach point | Check angles and coverage gaps | Split coins between repairs and the next upgrade | Assign responsibilities before the next wave |
Coins come from defeated Verities; the coin income guide covers earning beyond the wave, and defense upgrades covers what to fund first. If you are setting up a fresh account, current in-game codes are tracked on the Codes page.
Failure signals and the fix each one calls for
Most runs do not end randomly — they end at a breached wall, a blocked arc or an empty wallet. Each signal below points at a specific setup change:
| Failure signal | What it tells you | Setup change | Grounding |
|---|---|---|---|
| A lane consistently slips through | Existing coverage cannot clear that lane | Upgrade or add coverage on that lane only — not everywhere | Guide consensus |
| Turrets are blocked or misplaced | More turrets will waste coins | Fix placement and firing arcs before buying additional coverage | Guide consensus |
| The same walls keep getting broken | Structure is the limiting factor | Reinforce the most-attacked sections before untouched walls | Guide consensus |
| Waves survive long enough to damage the core | Coverage or placement is the problem | Fix blocked angles and gaps before adding turrets | Guide consensus |
| You went broke at nightfall with no repair funds | Overspending before the wave | Hold a reserve for emergency repairs plus one replacement turret | Guide consensus |
| Verities entered through a gap you cannot find | A coverage hole exists in the perimeter | Inspect walls and angles between every wave — one gap becomes the lane exploited all night | Recorded runs + guides |
| Attacked from a side or rear you left empty | The single-lane assumption failed | Rotate or extend coverage around the base as waves deepen | Recorded runs |
| Verities dug into your underground base | The below-ground approach was unguarded | Cover floors and guard all approaches, not just the front — see hiding underground | Recorded runs |
| A boss destroyed several turrets | Concentrated structures can be wiped in one push | Expect boss waves at milestones; keep a reserve to rebuild and replace | Recorded runs |
| Defenses fail specifically against giant Verities | Walls never upgraded after the early waves, or turrets placed so close that one large target blocks several firing fields at once | Upgrade the most-attacked wall and space turrets so each keeps a clear field | Fan-guide consensus |
The between-wave audit is what turns these symptoms into fixes: inspect damage, predict the next breach point, check angles and coverage gaps, assign responsibilities, and only then spend.
Run the loop against your next wave and let the failure table tell you what to change. When you are ready to fine-tune, the turret placement guide covers angle-by-angle positioning and controls, the turrets guide covers the full roster, and surviving more waves picks up where a working defense leaves off.
Related Guides
Turret Placement
Place turrets where they actually defend: cover the main approach, overlap firing arcs, and keep every lane covered.
Defense Upgrades
The documented upgrade route: repair first, spend between waves, and improve the firing positions already proving useful.
Turrets Guide
Every turret confirmed in gameplay — shotgun, gatling, Halo and variants — and which job each one does best.
Best Upgrades First
A conditional first-purchase order: walls, first turret, repair reserve — and how wave phase changes priorities.