
How to Survive More Waves in Bunker vs Verity
A practical improvement path for longer Bunker vs Verity runs: build a defensible one-entrance bunker, spend coins by wave stage, inspect between waves, and fix the habits that end deep runs.
Surviving more waves in Bunker vs Verity comes down to three repeatable habits: build one compact, reinforced chokepoint instead of spreading defenses thin; never start a wave without a coin reserve for emergency repairs; and use every between-wave window to inspect the lane Verities are actually hitting. The game is designed against static plans — the official description states that the longer you survive, the harder the Verities become — so the decision that extends a run is preparing for the wave after next, not the one currently at your walls. This guide focuses on those decisions; the waves guide covers wave structure itself.
Build for repeat attacks
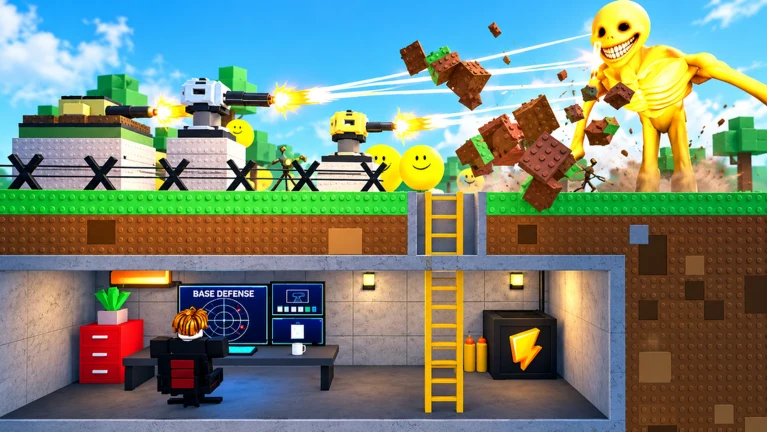
Survival guides converge on a compact, defensible bunker with one monitored entrance. Walls and the entrance come before any secondary rooms, interior routes stay clear so you can reposition mid-raid, and a fallback position behind the first layer is what saves late-wave runs. Spread-out defenses are weaker than one reinforced chokepoint — do not build several low-impact positions before you know which lane actually needs protection.
Turret placement follows the same logic: concentrate overlapping coverage on the main approach. Two turrets whose firing arcs cross at the entrance outperform two turrets watching separate secondary lanes, because a single gap in coverage becomes the lane Verities exploit all night. Put the first turret where it covers the approach to the entrance, and once a raid starts, stay inside the defensive zone — chasing Verities away from the bunker creates openings that waves will exploit. The turret placement guide breaks down arcs and positions, while the bunker building guide covers construction order step by step.
No layout wins forever, so match the build to your team size and expected run length:
| Build | Best for | Layout core | Main weakness |
|---|---|---|---|
| Compact Solo | Solo play, early survival | Small central room, controlled entrance | Blocked firing angles are very costly |
| Cooperative Crossfire | 2+ players | Central area with two overlapping firing lanes | Crowding limits movement and visibility |
| Long-Wave Reinforced | Extended, later waves | Primary line plus interior fallback route | Expensive, slow to finish; unfinished sections are vulnerable early |
| Hidden-Defense | Protecting turrets | Defenses behind strong wall sections | Over-cover creates blind spots |
Guide comparisons rate the Long-Wave Reinforced build highest for late-wave scaling and repair access but lowest on cost efficiency, while the Compact Solo build wins entrance control and cost efficiency but scales weakest into deep runs. The best bunker layout page compares these in detail.
Glass layouts — transparent walls that maximize turret sightlines and early threat detection — trade durability for visibility. They are viable in early and mid waves, but concentrated late-wave attacks break transparent sections quickly. The standard fix is a reinforced fallback line behind the glass; once enemy durability scales up, stop replacing glass and shift spending to that fallback line and turret upgrades. Solo players cannot repair and fight simultaneously, so build the fallback earlier than a co-op team would and hold a larger repair reserve.
Spend coins by wave stage
The spending rules guides repeat most: never spend the full coin balance before nightfall, because a single breached wall can end a run regardless of turret count; a repair fund is usually worth more than a small early upgrade; and treat late-wave rewards as reinforcement funds, not spending money. You also cannot build while a Verity wave is active — guides and creator footage agree on this — so every reinforcement decision happens in the prep window before the next night.
Guides phase the spending almost identically (these are player-authored formulas, not official in-game numbers):
| Phase | Wall priority | Turret priority | Coin rule |
|---|---|---|---|
| Early waves | Close exposed entrances before upgrades | One turret on the main approach | Keep a reserve after your first builds |
| Middle waves | Upgrade the sections enemies repeatedly attack | Add coverage only when a lane keeps slipping through | Fund repairs plus one upgrade |
| Late waves | Reinforce the weakest sections first | Upgrade effective, overlapping positions | Enter hard waves with a full reserve |
| Between waves | Inspect damage and predict the next breach point | Check firing angles and coverage gaps | Split coins between repairs and the next planned upgrade |
Entering a difficult wave with an empty balance is one of the most commonly cited causes of late-run collapses — do not rely on income earned mid-attack. Kills pay coins throughout the raid, and topping up between runs helps: see how to get coins, and check the Codes page for active codes. The cushion matters more than the balance size, though — reserve discipline is the habit that carries runs.
Run the same inspection between waves
Most late-run failures trace back to a weakness spotted too late, so treat every prep window the same way:
- Walk the perimeter. Check damaged wall sections, turret firing angles and coverage gaps.
- Learn your lane. Watch which approach takes the most damage in the first two waves — Verities tend to concentrate on the same route, so reinforce that side instead of spreading walls evenly. Before adding any new turret, watch one full night and note which section takes the most damage; that section is where the next coin belongs.
- Reset the defenses. Repair all damaged sections, verify every turret has a clear firing angle, and confirm the reserve covers at least one emergency repair.
- Predict the next breach. Identify the most likely entry point and reinforce it before the wave begins.
- Assign roles (co-op). The builder maintains structure, the gunner controls turrets and sustained damage, and the scout watches exposed approaches — agreed before the wave starts, with short callouts (lane, repair needed, urgency) during the fight.
One timing nuance: repair preventively during the prep window, but if a breach opens mid-wave, repair first — a breach ends a run faster than lacking extra damage. Co-op teams survive deeper waves when every player has a clear job; duplicate building and unattended lanes are the two most commonly cited causes of bunker failure. The defense strategy page expands on these routines, and the beginner guide covers the first-run basics.
Upgrade what is actually limiting survival
Upgrade whichever wall or turret is directly limiting survival. If enemies break through walls, reinforce those sections; if waves survive long enough to damage the bunker, coverage or placement is the problem — fix blocked firing angles before buying new turrets. A blocked turret contributes zero damage regardless of its tier, and if two turrets watch the same lane while another approach is untouched, redistribute rather than stack.
One well-placed turret handles early waves only. As Verity durability and group size grow, build a network where each role covers a gap: crowd control for grouped pushes, single-target damage for durable threats. Two documented dead ends to avoid: fast-attack early defense is an opening-phase tool that loses value once enemy durability rises, and narrow-specialty turrets shine only in their exact lane before dropping sharply when the wave pattern changes. Failed defenses against giant Verities trace back to two causes — walls never upgraded after the early waves, and turrets placed so close together that one large target blocks several firing arcs at once. The turrets guide, defense upgrades page and best upgrades first page cover the upgrade order.
Why a working defense stops working
The difficulty rule is official: the longer you survive, the harder the Verities become. Guides describe the shift — waves start as small, low-durability trickles and grow into dense groups of durable units that concentrate pressure on weak sections and cause breach cascades. They also mix threat types: fast rushers for entrances, durable wall-breakers that absorb turret fire, and grouped pushes arriving from multiple lanes. That variety is why a defense built around one turret type or one firing lane eventually fails.
Creator gameplay with visible wave counters shows the same collapse modes happening:
- A defense covering only the center and front was hit from the sides at higher waves — a direction the player explicitly did not expect — after a mini-boss had already destroyed a turret; the run ended at wave 18 when explosive Verities breached in.
- Surface defenses were bypassed entirely when Verities dug underground into a basement room; the player's conclusion was that weapons should ring the whole base, because enemies do not come only from the front. Even the official option to hide underground is not a guarantee — diggers exist.
- One raid ended when Verities poured through a single unnoticed gap the player could not find at first, which is exactly what the between-wave perimeter walk is for.
- A boss broke in through a destroyed door while attacks also came from behind, forcing mid-wave repositioning — and upgrades were unavailable during the assault.
Guides add the self-inflicted versions: entering a hard wave without a reserve, blocked firing angles, coverage gaps, abandoning the defense to chase enemies, overspending before nightfall, and judging the bunker by early-wave performance. As for the numbers: typical runs in the footage ended between waves 8 and 26, while one heavily-invested creator reached wave 90–91 after sealing the bunker with high-HP blocks, tens of millions of accumulated coins and rebirth progression. Treat those as single-session showcases, not benchmarks for a normal save. The Verity enemies page profiles the attacker types, the wave difficulty page tracks the scaling curve, and the Updates page notes changes as the game evolves.
Test one change per run
Pick one change for your next run — hold a full reserve into the wave that killed you last time, reinforce the lane that took the most damage, or unblock one turret arc — and compare how many waves you survive across a few runs. Wave counts vary with investment and session luck, so measure against your own runs, not creator milestones. No layout wins late waves forever; the goal is pushing your personal floor a few waves higher each time.
Related Guides
Wave Difficulty
See what actually changes each wave as Verities grow tougher, and why no official thresholds or final wave exist.
Defense Strategy
Run the day-to-night defense cycle: overlapping turret coverage, repairs under fire, and coin spending by wave phase.
Best Upgrades First
A conditional first-purchase order: walls, first turret, repair reserve — and how wave phase changes priorities.
Verity Enemies Guide
Identify each Verity type and its confirmed attack behavior, then match defenses to rushes, diggers, and late variants.